Zoom LiveTrak L-8 Podcasting Console: Complete Beginner's Guide 2026
Zoom LiveTrak L-8 Podcasting Console: What Australian Podcast Beginners Need to Know
If you're starting a podcast in 2026 and researching equipment, you've probably stumbled across something called a "podcasting console" and wondered what makes it different from a regular mixer. The Zoom LiveTrak L-8 keeps popping up in recommendations, but as a newcomer, you might be thinking: what exactly does this thing do, and do I actually need it?
Let's break down everything a podcast beginner needs to understand about the LiveTrak L-8—what it is, why it exists, and whether it's the right choice for your first serious podcast setup.
What Actually Is a Podcasting Console?
Before we dive into the L-8 specifically, let's demystify what a podcasting console actually is—because this isn't just marketing speak for "mixer."
Think of a podcasting console as a specialised audio workstation designed specifically for spoken-word content creation. Unlike music mixers that focus on instruments and complex multi-track mixing, podcasting consoles prioritise:
- Multiple microphone inputs with clean preamps (for hosting guests)
- Easy recording capabilities without needing a computer running
- Sound effects and jingles triggered at the touch of a button
- Mix-minus functionality for remote callers (prevents echo)
- Straightforward controls that don't require audio engineering knowledge
- Simultaneous recording and live streaming options
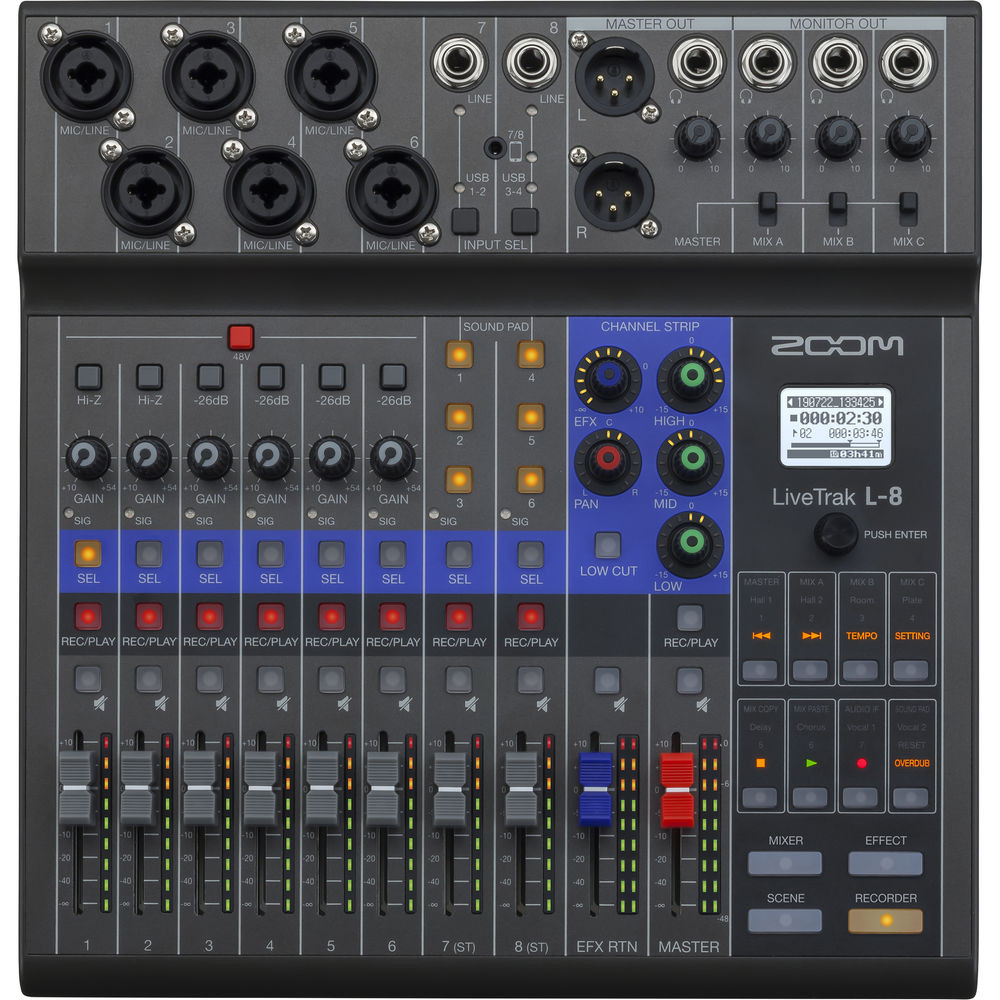
The Zoom LiveTrak L-8 embodies all these principles in a compact, desktop format. It's essentially your entire podcast production studio condensed into a portable box that doesn't require you to become an audio engineer to operate.
Understanding the L-8: What Makes It Different
The LiveTrak L-8 sits in an interesting sweet spot in the podcasting world. It's more capable than basic USB microphone setups, but far less intimidating than professional broadcast consoles. Here's what actually sets it apart:
The Eight-Track Concept
The "L-8" name refers to its eight-track recording architecture. In practical terms, this means you can record up to eight separate audio sources simultaneously, each on its own dedicated track. Why does this matter?
Imagine recording a four-person podcast where everyone has their own microphone. If you record everyone onto a single stereo track (like many simple setups do), you can't fix individual issues later. If one person coughs, talks too quietly, or has background noise, you're stuck with it.
With eight separate tracks, you can adjust each person's volume independently during editing, remove unwanted sounds from specific mics, and generally rescue problematic recordings that would otherwise be unusable.
Built-In Recording (No Computer Required)
One of the L-8's biggest advantages for beginners is that it records directly to SD cards. You don't need a laptop running recording software, dealing with driver issues, or worrying about your computer crashing mid-episode.
This standalone capability means you can literally grab the L-8, power it with a USB battery pack, and record a podcast episode anywhere—in a park, at an event, in someone's lounge room. For mobile podcasters or those who travel for interviews, this is genuinely liberating.
The Sound Pad System
Six customisable sound pads let you trigger pre-loaded audio clips during recording—intro music, transition jingles, sound effects, sponsor messages, whatever you need. This sounds simple, but it transforms podcast production from "record everything, then edit it all together later" to "produce your episode live as you record."
For beginners, this can dramatically reduce editing time. Load your intro music, your "let's take a break" jingle, and your outro onto the pads, and you can essentially produce a structured episode in real-time.
Key Features Explained Simply
Let's break down the L-8's main features in plain language, focusing on what they actually mean for your podcast workflow:
Input Configuration
The L-8 provides six physical inputs, but the routing is clever:
- Four XLR/TRS combo inputs with phantom power—these are for your microphones or instruments
- Two additional TRS inputs for line-level sources (keyboards, phones, laptops)
- Bluetooth audio input (recorded to its own track)
- Sound pad playback (also recorded separately)
Translation for beginners: You can connect four people with standard podcast microphones (like the widely-used Shure SM58 or Audio-Technica AT2020), plus play audio from your phone via Bluetooth, plus trigger sound effects—all at the same time, all recorded separately for editing flexibility.
Mix-Minus for Phone Interviews
This is where things get technical-sounding, but the concept is simple. When you call someone on speakerphone and talk to them, they hear themselves with a slight delay through your speakers, creating annoying echo.
The L-8's mix-minus sends solve this by sending your remote guest everything except their own voice. They hear you and your studio guests clearly, but not their own voice bounced back at them. The result? Professional-sounding phone interviews without echo.
This feature alone elevates the L-8 above simple mixers for podcast production. Remote interviews sound properly professional.
Recording Modes
The L-8 offers three recording modes, which is genuinely useful as your podcast evolves:
- Multitrack mode: Records up to eight separate tracks (each input isolated) for maximum editing control
- Stereo mode: Records your final mix to a single stereo file—perfect when you're confident and want minimal editing
- Multitrack + Stereo: Records both simultaneously—you get the stereo "safety" recording plus individual tracks if needed
Beginner tip: Start with multitrack + stereo mode. It uses more SD card space, but the safety net is worth it when you're learning. You'll catch mistakes you didn't notice during recording.
USB Audio Interface Capability
While the L-8 can record standalone, it also functions as an eight-in/two-out USB audio interface. Connect it to your computer, and you can record directly into editing software (Adobe Audition, Audacity, Reaper, etc.) or stream live to platforms like YouTube or Zoom.
This dual functionality means the L-8 grows with you. Start recording standalone episodes, then later add video streaming, remote recording software, or advanced DAW-based production without replacing your core equipment.
Who Is the L-8 Actually For?
Here's the honest assessment of who benefits most from the LiveTrak L-8:
Perfect For:
- Multi-host podcasts with 2-4 regular co-hosts in the same room
- Interview-format shows with rotating guests (in-person or via phone)
- Podcasters who value portability and want to record outside a fixed studio
- Creators who want live production capabilities (playing jingles, music, effects during recording)
- Beginners willing to invest $599-$699 AUD in an all-in-one solution that eliminates most other equipment needs
- People who prefer physical controls over software interfaces
Probably Overkill For:
- Solo podcasters who never have guests and don't need sound effects—a simple USB mic will serve you better
- Purely remote podcasts where everyone records separately from different locations—software solutions like Riverside.fm or SquadCast work better here
- Absolute tight budgets—if $600+ is stretching too far, start simpler and upgrade later
Might Outgrow Eventually:
- Video podcasters who need extensive video switching and multiple camera management
- Podcasters expanding to full radio-style production with multiple call-in lines and complex routing
Common Beginner Questions Answered
Do I Need Anything Else to Start Podcasting?
The L-8 is powerful, but it's not a complete solution by itself. Here's what you'll also need:
- Microphones: The L-8 doesn't include mics. Budget for XLR microphones (dynamic mics like the Rode PodMic or Audio-Technica ATR2100x are excellent podcast starters at $99-$199 each)
- XLR cables: One for each microphone (budget $15-$30 per cable for decent quality)
- SD card: The L-8 records to SD/SDHC/SDXC cards—get at least 32GB, Class 10 or better
- Headphones: Essential for monitoring audio quality and catching issues during recording
- Power source: USB power adapter (5V/1A) or USB battery pack for portable use
Realistic starter budget: L-8 console ($650) + two PodMics ($200 each) + two XLR cables ($40) + SD card ($20) + basic headphones ($50) = roughly $1,160 AUD for a proper two-person podcast setup.
Is the Learning Curve Steep?
Honestly? The L-8 is remarkably intuitive for what it does, but there's still a learning phase. Expect:
- First session: 30-60 minutes getting familiar with the layout, understanding what each knob does, recording test audio
- First real episode: You'll probably make small mistakes (forgetting to arm a track, setting levels incorrectly), but nothing catastrophic
- After 3-5 episodes: Operation becomes second nature—you'll set up and start recording within minutes
The physical interface is actually a learning advantage for beginners compared to software mixers. Each function has a dedicated button or knob you can see and touch. There are no hidden menus or confusing software tabs to navigate.
What About Audio Quality?
The L-8's preamps are genuinely good for this price point. They're not the absolute top-tier preamps you'd find in $3,000+ broadcast consoles, but they deliver clean, professional-sounding audio that meets broadcast standards.
Recording specs: 24-bit/96kHz maximum quality, which is serious overkill for podcasts (most platforms deliver 128kbps compressed audio anyway). The point is that the L-8 won't be your quality bottleneck—your microphone choice and room acoustics will matter far more.
Can I Grow Into It or Will I Outgrow It Quickly?
This is the key question for beginners considering a $650 investment. The honest answer: the L-8 has exceptional longevity for most podcasters.
You won't outgrow it unless your podcast evolves into something requiring more than four simultaneous in-studio guests, or you move into full video production with multiple cameras. For the vast majority of podcast formats—interview shows, co-hosted discussions, documentary-style productions—the L-8 remains entirely capable even as you become more sophisticated.
Many professional podcasters with successful shows still use the L-8 because it does exactly what they need without unnecessary complexity.
Alternatives to Consider
For context, here's how the L-8 compares to other common beginner approaches:
Simpler Option: Rode RODECaster Pro II ($699-$799)
More user-friendly interface, built specifically for podcasting with smart features like auto-muting and processing. Slightly more expensive but arguably easier for absolute beginners. Trade-off: less versatile if you want to do music recording or complex audio routing.
Budget Option: Behringer Xenyx Q802USB ($89) + Recording Software
Much cheaper upfront, but you'll need a computer running during recording, you lose the sound pads and standalone recording, and you're limited to simpler setups. Good starting point if you're uncertain about podcasting commitment.
Software Option: Remote Recording Platforms (Riverside.fm, SquadCast)
If your podcast is primarily remote interviews with guests joining via internet, dedicated software platforms might serve you better than hardware mixers. Monthly subscription costs, but no upfront hardware investment and excellent remote audio quality.
Real-World Workflow: What Using the L-8 Actually Looks Like
Let's walk through a typical podcast recording session with the L-8 to make this concrete:
- Setup (5 minutes): Connect microphones to channels 1 and 2, insert SD card, power on, adjust input gain knobs while doing mic checks until level meters hit the green zone
- Load sound pads (2 minutes): Load your intro music, mid-roll ad, and outro onto sound pads 1-3 via the SD card
- Set recording mode: Select multitrack + stereo for safety
- Record intro (1 minute): Hit record, press sound pad 1 to play intro music, start talking over the music fade
- Main content (20-45 minutes): Have your conversation, monitor levels occasionally, press sound pads when needed for transitions
- Record outro (1 minute): Trigger outro music on sound pad 3, wrap up your episode
- Stop and save: Hit stop, the L-8 finalises the recording to SD card
- Transfer and edit (later): Pop out the SD card, transfer files to your computer, edit in your preferred software
Total hands-on time with the L-8: about 30 seconds to press record and stop. Everything else is your actual podcast content. That's the beauty of dedicated hardware—it gets out of your way.
Common Beginner Mistakes to Avoid
Having helped many new podcasters set up their L-8 systems, here are the mistakes I see repeatedly:
- Not using headphones during recording: Monitoring through headphones lets you catch audio issues (buzzing, low levels, strange noises) in real-time when you can fix them, not hours later during editing
- Recording in stereo mode only: You save SD card space but lose all editing flexibility—stick with multitrack mode until you're genuinely confident in your live production skills
- Setting input gain too low or too high: Aim for level meters peaking in the -12dB to -6dB range (green zone)—too low means noisy audio, too high means distortion
- Forgetting to arm tracks: The L-8 requires you to arm tracks for recording (press the track select buttons)—double-check before starting that your tracks show recording indicators
- Buying cheap XLR cables: Poor cables cause intermittent crackling and dropouts that are maddening to troubleshoot—invest in decent cables from brands like Mogami, Neutrik, or at minimum Rode
- Ignoring room acoustics: The L-8 can't fix a terrible-sounding room—record in spaces with soft furnishings, avoid empty rooms with hard surfaces, consider acoustic treatment if you're serious
Getting Started: Your First Session
When your L-8 arrives, resist the urge to immediately record your first episode. Instead:
- Do equipment setup without pressure: Connect everything, read the quick start guide, power on, explore the interface without recording
- Record test audio: Have conversations with yourself or a friend, experiment with different gain levels, play back recordings through headphones
- Learn the sound pads: Load audio files onto your SD card (the manual explains the file structure), trigger them, adjust their volumes
- Practice the complete workflow: Record, stop, remove SD card, transfer files to computer, open them in editing software—make sure you understand the entire process
- Do a complete test episode: Record a full-length practice episode with your actual format—intro, content, outro, everything—then listen back critically
Only after you're comfortable with the technical workflow should you record your actual first episode. The confidence you gain from practice shows in your on-air performance.
Is the Zoom LiveTrak L-8 Worth It for Beginners?
Here's the bottom line for Australian podcast newcomers considering the L-8:
This is a serious investment ($650+) that makes sense if you're committed to producing quality podcasts with multiple people and you value production flexibility. The L-8 doesn't hold your hand like some alternatives, but it respects your intelligence and gives you professional capabilities from day one.
It's not the cheapest way to start podcasting, but it's one of the most balanced ways—powerful enough to grow with you, but not so complex that you'll be overwhelmed for months.
If you're still uncertain about your podcast concept or whether podcasting is right for you, start simpler. But if you're past the "just testing the waters" phase and ready to build something real, the LiveTrak L-8 is genuinely one of the best foundations you can establish.
The podcasters I know who bought the L-8 as beginners consistently report the same experience: initial intimidation for a week, then competence, then genuine appreciation for having professional tools that don't get in their way. Three years later, they're still using the same console because it still does everything they need.
Ready to take your podcast production seriously? Check current availability and pricing for the Zoom LiveTrak L-8 at MusicOnStage—they're Australian-based, understand local podcasters' needs, and can answer specific setup questions about your planned configuration.
Next Steps After Your Purchase
Once you've got your L-8 and accompanying gear, here's your roadmap:
- Join podcasting communities: The Zoom LiveTrak Facebook group and r/podcasting subreddit offer tremendous beginner support
- Watch the official Zoom tutorials: YouTube has comprehensive L-8 setup guides directly from Zoom
- Invest in basic acoustic treatment: Even cheap foam panels or DIY solutions (heavy curtains, bookshelves) dramatically improve audio quality
- Learn basic audio editing: Free software like Audacity or Reaper has gentle learning curves—YouTube tutorials abound
- Focus on content, not perfection: Your first episodes won't sound like NPR productions, and that's fine—podcast listeners value authenticity and interesting content over technical perfection
The technical gear is just enabling infrastructure. The L-8 gives you professional tools, but your content, your perspective, and your consistency are what actually build an audience. Get comfortable with your equipment quickly, then put your creative energy into making something worth listening to.
Welcome to podcasting. The L-8 is a genuinely capable companion for the journey ahead.
Explore the Zoom LiveTrak L-8 at MusicOnStage and start building your podcast production setup with equipment that grows with your skills.