
Shure SM7B Explained: A Beginner's Guide to This Iconic Microphone 2026
Shure SM7B Explained: A Beginner's Guide to This Iconic Microphone 2026
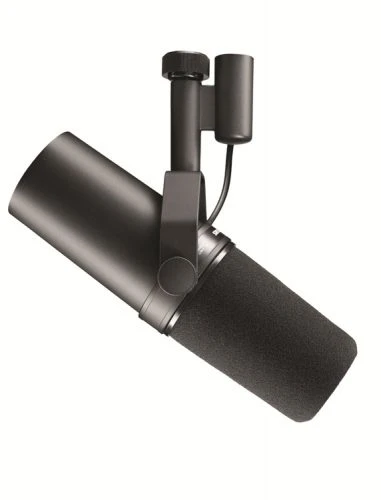
If you've been researching microphones for podcasting, streaming, vocal recording, or broadcast work, you've almost certainly come across the Shure SM7B. It's one of the most talked-about microphones in the world — and for good reason. But if you're new to audio gear, you might be wondering what all the fuss is about, whether it's right for you, and what you actually need to get it up and running.
This guide is written specifically for beginners. We'll break down exactly what the SM7B is, why it's earned its legendary reputation, what you need to know before buying one, and whether it's the right first step for your audio journey here in Australia.
What Is the Shure SM7B, Exactly?
Let's start with the basics. The Shure SM7B is a dynamic microphone — but what does that actually mean?
Microphones broadly fall into two main categories: dynamic and condenser. Think of it like this: a condenser microphone is like a sensitive hearing aid that picks up every tiny sound in a room — great for controlled studio environments, but it can be a nightmare if your room isn't acoustically treated. A dynamic microphone, on the other hand, is more like cupping your hand around your ear — it focuses on what's right in front of it and naturally rejects background noise.
The SM7B is a dynamic microphone with a cardioid polar pattern. "Cardioid" simply means it picks up sound primarily from the front while rejecting noise from the sides and rear. This makes it exceptionally forgiving in less-than-perfect recording environments — which, let's be honest, is most home setups.
A Quick History Worth Knowing
The SM7B has a genuinely iconic backstory. Its predecessor, the SM7, was the microphone used to record Michael Jackson's vocals on Thriller — the best-selling album of all time. That's not just marketing trivia; it tells you something about the microphone's character. It handles vocals with a warmth and smoothness that's difficult to replicate at any price point.
Over the decades, the SM7B has become the industry standard in radio broadcasting, and more recently, it's become the microphone of choice for professional podcasters and streamers worldwide. When you see a podcaster sitting behind a big, chunky black microphone on a boom arm, chances are it's an SM7B.
Why People Choose the SM7B: Key Features Explained Simply
Let's walk through the features that make this microphone special — and more importantly, what they actually mean for you.
Flat, Wide-Range Frequency Response
What this means: Frequency response describes the range of sounds a microphone can capture, from deep bass to high treble. The SM7B has a frequency response of 50Hz to 20kHz, which covers the full range of the human voice and then some.
Why it matters to you: The SM7B captures your voice accurately and naturally. It doesn't artificially boost certain frequencies to make you sound "better" — instead, it reproduces your voice faithfully. This is actually a huge advantage because it gives you a clean starting point that you can shape later if you choose to. Whether you have a deep, resonant voice or a higher-pitched one, the SM7B handles it beautifully.
Electromagnetic Shielding (Hum Rejection)
What this means: Electronic devices — your computer monitor, your Wi-Fi router, even your phone — emit electromagnetic interference (EMI) that some microphones pick up as an annoying hum or buzz.
Why it matters to you: The SM7B is specifically designed to reject this interference. Shure built advanced shielding into the microphone so you can use it right next to your computer without picking up electrical noise. For home studio users, this is a genuinely practical advantage that you'll appreciate every single recording session.
Bass Rolloff and Presence Boost Switches
What this means: On the back of the SM7B, you'll find two small switches. The bass rolloff reduces low-frequency rumble (things like air conditioning noise, traffic vibration, or the thud of footsteps). The presence boost adds a subtle lift to the mid-range frequencies where vocal clarity lives.
Why it matters to you: These switches let you tailor the microphone's sound without needing any software or external equipment. As a beginner, here's a good starting point:
- For podcasting and speech: Try engaging both switches — the bass rolloff cleans up room rumble, and the presence boost adds clarity to your voice
- For singing: Start with both switches flat (off) and adjust from there based on what sounds best to your ear
- For streaming: The bass rolloff is generally helpful; the presence boost depends on your voice and preference
Replaceable Windscreen
The SM7B comes with two windscreens — the standard one and the close-talk version (the larger, puffier one often called the "big muff"). The close-talk windscreen is designed for when you're speaking very close to the microphone, which is actually the ideal technique for this mic. Both windscreens reduce plosives — those harsh "P" and "B" sounds that can cause unpleasant popping in recordings.
Built Like a Tank
This isn't a delicate piece of equipment. The SM7B is built to professional broadcast standards, which means it's designed to survive years of daily use. The all-metal construction feels substantial and reassuring. For Australians investing in quality gear, knowing your microphone will last a decade or more is a significant consideration.
What You Need to Know Before Buying: The Gain Question
Here's the single most important thing beginners need to understand about the SM7B, and it's something that catches many people off guard: this microphone needs a lot of gain.
What is gain? Gain is essentially how much your audio interface or preamp amplifies the microphone's signal. Different microphones produce different levels of signal — some are "hot" (produce a strong signal) and some are "quiet" (produce a weak signal that needs more amplification).
The SM7B is on the quieter side. It has an output level of -59 dBV/Pa, which in plain English means your audio interface needs to work harder to bring the signal up to a usable level. This isn't a flaw — it's a characteristic of the microphone's design that contributes to its excellent noise rejection. But it does mean you need to think about what you're plugging it into.
Your Options for Powering the SM7B
- A quality audio interface with plenty of gain: Interfaces like the Focusrite Scarlett range (newer models), Universal Audio Volt series, or the MOTU M2 can drive the SM7B adequately. Look for interfaces offering at least 60dB of clean gain. Many modern interfaces in the $250-$500 AUD range handle the SM7B just fine.
- An inline preamp/booster: Products like the Cloudlifter CL-1 or the TritonAudio FetHead sit between the SM7B and your audio interface, providing an extra 25-28dB of clean gain. This is a popular solution if you already own an interface that struggles with the SM7B's gain requirements.
- A dedicated preamp: Higher-end preamps like the dbx 286s not only provide enough gain but also add processing features like compression and de-essing. This is a more advanced (and more expensive) route, but worth mentioning.
Beginner tip: If you're buying everything from scratch, budget for a capable audio interface rather than buying a cheap one plus a booster. A good interface will serve you better across all your future microphone purchases.
Common Beginner Mistakes to Avoid
Having helped plenty of newcomers navigate their first microphone purchase, here are the pitfalls we see most often with the SM7B:
1. Pairing It with a Budget Interface
The most common mistake, full stop. Plugging an SM7B into a $60 audio interface and wondering why it sounds quiet, noisy, or both. The microphone is only as good as what's amplifying it. Budget around $300-$500 AUD for your audio interface if you're going the SM7B route.
2. Not Using a Boom Arm
The SM7B is designed to be used close to your mouth — ideally 5 to 15 centimetres away. It comes with a built-in yoke mount (the bracket that holds it), but you'll almost certainly want a boom arm to position it correctly. The mic itself weighs about 765 grams, so make sure your boom arm is rated for that weight. The Rode PSA1+ or similar quality arms handle it well.
3. Expecting Condenser-Like Sensitivity
If you're coming from a condenser microphone, you might initially feel like the SM7B sounds "duller" or quieter. That's not a problem — it's the microphone doing exactly what it's designed to do: rejecting room noise and focusing on what's directly in front of it. Once you get your levels right and position the mic correctly, you'll hear why professionals love its sound.
4. Overthinking the Setup
Despite what YouTube gear reviewers might suggest, the SM7B doesn't require thousands of dollars of additional equipment. A solid audio interface, an XLR cable, and a boom arm — that's your core setup. Everything else is optional.
Who Is the SM7B Actually For?
Let's be honest about who will get the most value from this microphone:
Ideal for:
- Podcasters who want broadcast-quality sound without treating their entire room
- Streamers who need a microphone that rejects keyboard clicks, mouse sounds, and background noise
- Vocalists recording in home studios that aren't acoustically perfect
- Voice-over artists wanting a warm, professional sound
- Broadcast professionals — it's literally built for this
Might not be the best first choice if:
- You're on a very tight budget (the mic plus proper interface pushes your total investment higher)
- You need to record acoustic instruments at a distance — a condenser microphone would generally be better for that
- You want a simple USB plug-and-play solution with no additional gear needed
How Does It Compare? Setting Realistic Expectations
If you're wondering how the SM7B stacks up against other popular options, here's a quick honest comparison:
SM7B vs. USB microphones (Blue Yeti, Rode NT-USB, etc.): USB mics are simpler to set up — plug in and go. The SM7B requires an audio interface and XLR cable but delivers significantly better sound quality and noise rejection. If convenience is your top priority and budget is limited, a quality USB mic is a perfectly valid choice. But if you're serious about audio quality and plan to grow, the SM7B is a worthwhile investment.
SM7B vs. Rode PodMic: The PodMic is an excellent budget dynamic microphone that's much easier to drive (it doesn't need as much gain). At roughly a third of the price, it's a smart entry point. However, the SM7B has a noticeably smoother, more refined sound and superior electromagnetic shielding.
SM7B vs. Electro-Voice RE20: The RE20 is another broadcast legend with a different tonal character — it's slightly brighter and has virtually no proximity effect (bass boost when you get close). Both are outstanding; the choice often comes down to personal voice character and preference.
What the Total Investment Looks Like in Australia
Let's talk real numbers so you can budget properly:
- Shure SM7B microphone: Check current pricing at MusiconStage
- Audio interface (mid-range): $300–$500 AUD
- XLR cable (quality): $25–$50 AUD
- Boom arm: $100–$200 AUD
- Optional inline preamp: $200–$250 AUD (only if your interface needs the extra gain)
Total realistic budget: approximately $800–$1,400 AUD for a complete setup, depending on the interface you choose and whether you need a gain booster.
That might sound like a lot, but consider this: the SM7B itself will likely last you 10-15 years or more. Shure's build quality is exceptional, and they continue to support this product with replacement parts. It's genuinely a buy-once proposition for most people.
Getting Started: Your First Session with the SM7B
Once you've got your SM7B and audio interface, here's what to expect:
- Connect your XLR cable from the microphone to your audio interface. The SM7B does NOT require phantom power (the +48V button on your interface) — leave that off. It won't damage the mic if you accidentally turn it on, but it's not needed.
- Position the microphone about 10-15cm from your mouth, slightly off-axis (angled just a touch to the side rather than pointing directly at your lips). This reduces plosives while maintaining full sound quality.
- Set your gain. Turn up the gain on your interface until your voice peaks around -12dB to -6dB in your recording software. If you're maxing out the gain and still too quiet, that's when you'd consider an inline booster.
- Choose your windscreen. Start with the larger close-talk windscreen if you'll be speaking close to the mic (most people do).
- Experiment with the rear switches. Record a short clip with them flat, then try engaging the bass rolloff, then add the presence boost. Listen back and decide what sounds best for your voice and content.
Don't stress about perfection on day one. The SM7B is very forgiving, and you'll naturally develop better microphone technique over your first few sessions. The learning curve is gentle — most people sound noticeably improved within a week of regular use.
Frequently Asked Questions from Beginners
Do I need a Cloudlifter or FetHead with the SM7B?
Not necessarily. Many modern audio interfaces provide enough clean gain on their own. Try your setup without one first — if you find yourself maxing out the gain and still not getting enough level, or if you're hearing excessive noise (hiss) at high gain settings, then consider adding an inline booster.
Can I use the SM7B for music recording?
Absolutely. It's excellent on vocals and surprisingly versatile on guitar amplifiers and drums (particularly snare and kick). It won't replace a large-diaphragm condenser for every studio application, but it's far more capable than its "podcast microphone" reputation suggests.
Is the SM7B worth it over cheaper alternatives?
If you're committed to creating content long-term and have the budget for a proper setup, yes. The sound quality, build quality, and noise rejection are genuinely superior. However, if you're just testing the waters, starting with a more affordable dynamic mic and upgrading later is a perfectly sensible approach.
Does it work with a Mac/PC without drivers?
The SM7B connects via XLR to an audio interface — it's the interface that connects to your computer. Most quality interfaces are class-compliant, meaning they work without additional drivers on both Mac and Windows.
Should You Buy the Shure SM7B?
The SM7B has earned its reputation over decades for a reason. It delivers genuinely professional sound quality, handles imperfect recording environments with grace, and it's built to last longer than most of the technology you'll pair it with.
If you're serious about podcasting, streaming, vocal recording, or any voice-focused content creation, and you're prepared to invest in the supporting gear to drive it properly, the SM7B is one of the safest investments you can make in audio equipment. It's not the cheapest entry point, but it may well be the last vocal microphone you ever need to buy.
Ready to take the plunge? Check out the Shure SM7B at MusiconStage — we're here to help if you have any questions about getting your setup right.
And if you're still on the fence, that's completely fine. Bookmark this guide, do your research, and come back when you're ready. The SM7B isn't going anywhere — it's been the gold standard for years, and that's not changing anytime soon.