
Shure DMK57-52 Drum Mic Kit Explained: A Beginner's Complete Guide 2026
Shure DMK57-52 Drum Mic Kit Explained: A Beginner's Complete Guide 2026
If you've ever watched a live gig or listened to a professionally recorded drum track and wondered how they capture that punchy, full sound — the answer almost always starts with good microphones. And if you're just stepping into the world of drum miking for the first time, the sheer number of options out there can feel overwhelming.
That's exactly where the Shure DMK57-52 Drum Microphone Kit comes in. It's one of the most trusted starter kits in the industry, bundling together microphones that professional sound engineers have relied on for decades. Whether you're setting up a home studio, preparing to mic your first live gig, or simply trying to understand what drum miking actually involves, this guide will walk you through everything — no prior experience required.
What Is Drum Miking and Why Does It Matter?
Let's start at the very beginning. Drum miking is simply the process of placing microphones on or near a drum kit to capture the sound of each drum individually (and sometimes the kit as a whole). Think of it like this: if you took a photo of a group of people, a single wide-angle shot would capture everyone, but individual portraits would show each person's unique features in detail. Drum miking works the same way.
When you mic individual drums — the kick drum, the snare, the toms — you gain independent control over each sound. That means you can:
- Adjust the volume of each drum separately in the mix
- Apply effects like reverb or compression to specific drums
- Shape the overall drum sound to fit the music
- Get a much more defined, punchy, and professional result
Without individual microphones, you're limited to whatever a single room mic or overhead picks up, which often sounds muddy and uncontrolled — especially in live settings where stage noise competes with everything.
What Exactly Is the Shure DMK57-52 Kit?
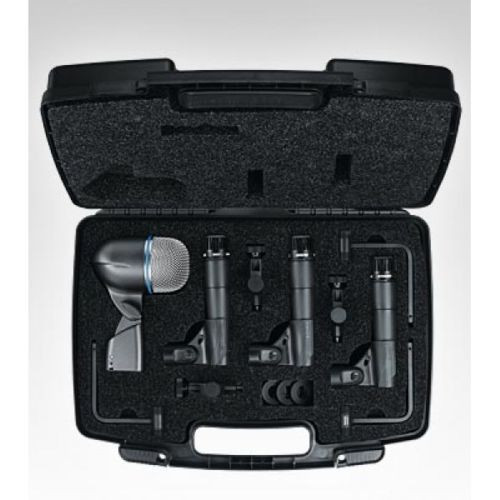
The Shure DMK57-52 is a purpose-built drum microphone package that includes everything you need to mic the most important parts of a standard drum kit. Here's what's inside the box:
- 3 x Shure SM57 microphones — for snare and toms
- 1 x Shure Beta 52A microphone — for the kick (bass) drum
- 3 x A56D drum mount adaptors — these clip onto drum rims so you don't need separate mic stands
- A padded carry case — to keep everything protected and organised
That's four microphones total, plus the mounting hardware and storage you need. It's designed to be a grab-and-go solution — open the case, clip the mics on, and you're ready to capture sound.
New to These Terms? Let's Break Them Down
Before we go further, here are a few terms you'll see throughout this guide:
- Dynamic microphone: A type of mic that doesn't need external power (called phantom power). Dynamic mics are rugged, handle loud sounds brilliantly, and are the go-to choice for drums and live vocals. Every mic in this kit is a dynamic microphone.
- Cardioid polar pattern: This describes the area around the microphone where it picks up sound. "Cardioid" means it mainly captures sound from the front and rejects noise from the sides and back. Imagine a heart-shaped bubble in front of the mic — that's the pickup zone. This is essential for drums because you want each mic to focus on its drum, not bleed from neighbouring drums.
- SPL (Sound Pressure Level): A measurement of how loud a sound is. Drums are extremely loud instruments, so you need microphones that can handle high SPL without distorting. Both the SM57 and Beta 52A are built for exactly this.
- Frequency response: The range of low-to-high sounds a microphone can capture. A kick drum produces very deep, low frequencies, while a snare crack has high-frequency snap. Different mics in this kit are tuned to capture different frequency ranges.
Understanding the SM57: The Workhorse of the Kit
The Shure SM57 is arguably the most famous microphone in the world. That's not marketing hype — it's been the standard for snare drums, guitar amps, and even presidential podiums for over 50 years. If you're new to audio, understanding why the SM57 matters will teach you a lot about what makes a good microphone.
Why the SM57 Works So Well on Drums
The SM57 has a natural presence peak in the upper midrange frequencies (around 5-10 kHz). In plain English, this means it slightly emphasises the "crack" and "attack" of a drum hit — the sharp, cutting sound that helps drums punch through a mix. It doesn't add this artificially; it's a natural characteristic of the microphone's design.
For snare drums, this presence peak captures the crack of the stick on the drumhead beautifully. For toms, it brings out the attack while the mic's solid low-mid response captures the body and resonance of the drum.
The SM57 also has excellent off-axis rejection, meaning it does a solid job of ignoring sounds coming from the sides. When you've got cymbals crashing centimetres away from your tom mics, this matters enormously.
Three SM57s in this kit gives you coverage for the snare drum plus two toms. If you play a standard four-piece or five-piece kit, that covers your core close-miking needs perfectly.
Understanding the Beta 52A: Purpose-Built for Kick Drums
While the SM57 is a versatile all-rounder, the Shure Beta 52A is a specialist. It's designed from the ground up to capture kick drums, and it does this job exceptionally well.
What Makes a Kick Drum Mic Different?
A kick drum produces some of the lowest frequencies on a stage — deep, powerful thuds that you feel in your chest. A general-purpose mic often can't reproduce these low frequencies accurately, or it might distort when hit with the sheer volume of a kick drum being played hard.
The Beta 52A is engineered with a shaped frequency response that emphasises the low-end punch (around 40-100 Hz) and the beater click (around 4 kHz). This gives you that classic kick drum sound: a deep, round boom combined with a defined "click" from the beater hitting the head. Many engineers find they need very little EQ when using a Beta 52A — it just sounds right straight out of the box.
It also features a supercardioid polar pattern, which is slightly tighter than a standard cardioid. This means even better isolation from other drums and stage noise — crucial when you're placing a mic inside or just outside a kick drum port hole with the entire kit thundering around it.
The Beta 52A's built-in dynamic locking stand adaptor makes positioning inside the kick drum simple and stable. Once you've placed it, it stays put — even during the most energetic performances.
Why a Kit Makes More Sense Than Buying Separately
If you're new to this, you might wonder: why not just buy four individual microphones? Here's why the kit approach is genuinely smarter for beginners:
- Cost savings: Purchasing three SM57s and a Beta 52A individually in Australia will typically cost you more than the kit price. The bundled package represents genuine value.
- Matched components: You know these microphones are designed to work together as a drum miking system. There's no guesswork about compatibility.
- Included mounting hardware: The A56D adaptors are often overlooked by first-time buyers. Without them, you'd need three extra mic stands crowding your drum riser. The clip-on adaptors are a massive space and hassle saver.
- Protective case: Microphones are precision instruments. The included case keeps them protected during transport and organised for quick setup. Buying a case separately adds cost and complexity.
- Simplicity: For a beginner, having one box with everything you need eliminates decision fatigue and the risk of buying incompatible gear.
A Beginner's Guide to Setting Up the DMK57-52
If you've never set up drum mics before, here's a straightforward walkthrough of what to expect. It's simpler than you might think.
Step 1: Kick Drum (Beta 52A)
If your kick drum has a port hole (a hole cut in the front head), position the Beta 52A just inside the hole, angled slightly toward where the beater strikes the back head. If there's no port hole, place it a few centimetres from the front head, centred. Start there and adjust to taste.
Step 2: Snare Drum (SM57)
Clip one SM57 onto the rim of your snare drum using the A56D adaptor. Angle it downward toward the centre of the drumhead, about 3-5 centimetres above the rim. Keep it close to the head for better isolation from the hi-hat.
Step 3: Toms (SM57s)
Use the remaining two A56D adaptors to clip your other two SM57s onto your rack and floor toms. Same principle — angle them toward the centre of the drumhead, a few centimetres above the rim.
Step 4: Cable Up and Sound Check
Connect each mic to your mixer or audio interface using standard XLR cables (these aren't included in the kit — you'll need four). Run a sound check by hitting each drum individually and adjusting levels on your mixer.
Beginner tip: Don't worry about getting perfect mic placement on your first try. Even professional engineers spend time tweaking positions. Start with the guidelines above, listen to the result, and make small adjustments. Moving a mic even one centimetre can noticeably change the sound.
What Else Will You Need?
The DMK57-52 covers your microphones and mounting, but here's what you'll need alongside it to complete your setup:
- 4 x XLR cables — one for each microphone. Buy decent quality cables; cheap ones can introduce noise and fail at the worst times.
- A mixer or audio interface — with at least 4 XLR inputs. For live sound, a mixer like a basic Allen & Heath or Yamaha unit will work. For recording, an audio interface with enough inputs (such as a Focusrite Scarlett 18i8 or similar) is what you need.
- A mic stand for the Beta 52A — a short boom stand works well for positioning inside the kick drum, though many players simply rest it on a towel or small pillow inside the drum.
- Optional: Overhead microphones — the DMK57-52 covers close mics for kick, snare, and two toms. For a fuller picture of the kit — especially cymbals, hi-hat, and room ambience — a pair of overhead condenser microphones is the natural next addition. But this is an upgrade, not a necessity for getting started.
Common Beginner Mistakes to Avoid
Having helped plenty of first-timers get set up over the years, here are the most common pitfalls:
- Placing mics too far from the drumheads: The further away the mic, the more bleed you get from other drums and cymbals. Keep close mics close — within 3-8 centimetres of the head.
- Forgetting about cable management: Loose XLR cables across a drum riser are a trip hazard and get tangled in hardware. Use cable ties or tape to run cables neatly along stands and off the floor.
- Not using the rim mounts: Some beginners put the SM57s on boom stands instead of using the included A56D adaptors. The rim mounts save space, reduce stand clutter, and actually give you more consistent positioning.
- Over-EQing the signal: These microphones sound excellent with minimal processing. Before reaching for EQ knobs, make sure your mic placement is right. Good placement solves most tonal issues.
- Ignoring gain staging: Set your input gain so that the loudest hits peak around -6 to -12 dB on your meter. This gives you headroom and prevents distortion. Drums are dynamic — they go from quiet ghost notes to full-power rimshots.
Who Is This Kit Best For?
The Shure DMK57-52 sits in a sweet spot that makes it suitable for a wide range of users:
- Gigging bands: If your band is starting to play venues with a PA system, this kit is the standard starting point for getting your drums into the mix. It's road-tough and sets up fast.
- Home studio recordists: Recording drums at home? This kit paired with a multi-input audio interface gives you professional-grade close mics for your recordings.
- Churches and community venues: Houses of worship and community halls across Australia use this exact kit because it's reliable, sounds great, and doesn't require an audio engineering degree to set up.
- Schools and music programs: Shure's build quality means these mics withstand student use (and occasional mishandling). Many Australian music schools spec this kit for their rehearsal and performance spaces.
- Sound hire companies: Rental companies stock DMK57-52 kits because they're the industry standard, clients expect them, and they last for years of heavy use.
The Shure Build Quality Factor
One thing that genuinely sets Shure apart — especially for beginners who might be comparing prices with cheaper alternatives — is build quality and longevity. The SM57 in particular is legendary for its durability. There are SM57s from the 1980s still in active use on stages around the world. They've been dropped, stepped on, rained on, and kept working.
When you're buying this kit, you're not just buying microphones for your next gig. You're buying microphones that will very likely outlast your current drum kit, your current mixer, and possibly your current musical career phase. The full manufacturer's warranty included with this kit gives you additional peace of mind, but honestly, Shure's reliability track record speaks louder than any warranty document.
For beginners, this matters because it means you're making a one-time investment in your drum miking setup. You won't be replacing these mics in a year or two because they've worn out or stopped performing. That changes the value equation significantly compared to cheaper alternatives that might need replacing.
Frequently Asked Questions from Beginners
Can I use this kit for a 5-piece drum setup?
The kit covers kick, snare, and two toms. If you have three toms, you'd need to purchase an additional SM57 and A56D mount for the third tom. Many players prioritise the rack toms and let the floor tom bleed into overheads, which works surprisingly well.
Do I need overhead microphones as well?
Not necessarily to get started. The DMK57-52 captures the core of your drum sound. Overheads are the natural next step when you want to capture cymbals, hi-hat detail, and the overall "picture" of the kit. For live sound, many smaller venues run perfectly well with just close mics.
Will these work with my audio interface?
Yes — these are standard dynamic microphones with XLR connections. They'll work with any mixer, audio interface, or preamp that has XLR inputs. They don't require phantom power (though it won't damage them if it's turned on).
How does this compare to cheaper drum mic kits?
There are drum mic kits available for significantly less money. However, the SM57 and Beta 52A are genuine industry standards used on recordings and stages worldwide. Cheaper kits often use microphones with less controlled frequency responses, lower build quality, and shorter lifespans. With the Shure kit, you're getting microphones that professional engineers actively choose — not budget compromises.
Is this kit overkill for home recording?
Not at all. In fact, home recording is where good microphones make the biggest difference. In a professional studio with treated acoustics, even average mics can sound decent. In an untreated home space, the SM57's excellent off-axis rejection and the Beta 52A's tight pattern help you capture cleaner drum sounds with less room interference.
Your Growth Path: What Comes Next
Once you've got the DMK57-52 and you're comfortable with basic drum miking, here's a natural progression for expanding your setup:
- Add a pair of overhead condensers — small-diaphragm condensers like the Rode M5 pair or AKG P170s are popular, affordable choices for overhead duties.
- Add a dedicated hi-hat mic — another SM57 or a small condenser works well here.
- Experiment with room mics — a single condenser placed a metre or two from the kit captures natural room ambience that you can blend in for depth.
- Learn about phase alignment — as you add more mics, understanding phase relationships between them becomes important. This is the next level of drum recording knowledge.
The beauty of starting with the DMK57-52 is that these microphones remain the core of your setup no matter how much you expand. You'll never "outgrow" SM57s on snare and toms or a Beta 52A on kick. They're endgame microphones at every level.
Ready to Get Started?
The Shure DMK57-52 is one of those rare products where the beginner choice and the professional choice are the same thing. You're not buying a "starter" kit that you'll replace later — you're buying the microphones that working engineers use on stages and in studios every single day.
If you're an Australian musician, band, venue, or studio looking to mic drums properly for the first time, this is the kit that removes all the guesswork.
Check out the Shure DMK57-52 Drum Mic Kit at MusiconStage — with full warranty and fast Australian shipping. It's the smart first step into drum miking that you won't regret.
Got questions about setting up your first drum mic kit? The team at MusiconStage is always happy to help Australian musicians get the right gear for their needs.