Rode Complete Studio Kit Explained: Your First Home Recording Setup 2026
Rode Complete Studio Kit Explained: Your First Home Recording Setup 2026
If you've been thinking about recording vocals, podcasts, voiceovers, or music at home but feel overwhelmed by all the gear you supposedly need, you're not alone. The world of audio recording can seem incredibly technical from the outside — microphones, interfaces, cables, phantom power... it's a lot of jargon to wade through before you even hit record.
That's exactly why all-in-one studio kits exist, and the Rode Complete Studio Kit is one of the most popular entry points for Australian beginners. It bundles everything you need to go from zero to recording in a single box, removing the guesswork of buying individual components that may or may not work well together.
In this guide, we'll break down exactly what's in the kit, what each piece does (in plain English), and whether it's the right starting point for your recording journey.
What Is a Studio Recording Kit, and Why Would You Want One?
Before we dive into the specifics, let's cover the basics. A studio recording kit (sometimes called a bundle or package) is a collection of audio equipment that gives you everything needed to record high-quality audio into your computer. Think of it like a starter toolkit for a tradie — instead of buying the hammer, screwdriver, and tape measure separately, you get a matched set that's ready to go.
Here's why bundles make sense for beginners:
- Compatibility guaranteed — every component is chosen to work together seamlessly
- Cost savings — buying bundled is almost always cheaper than purchasing each item individually
- No decision fatigue — you don't need to research which XLR cable works with which interface
- Balanced quality — manufacturers match components at a similar performance level, so there's no weak link
The alternative is piecing together your own setup component by component. That's great if you're experienced and know exactly what you want, but for someone just starting out, it often leads to buying the wrong cable, forgetting a crucial accessory, or spending hours on forums trying to figure out compatibility.
What's Inside the Rode Complete Studio Kit?
Let's unpack each component and explain what it does and why it matters. Don't worry if some of these terms are new to you — we'll define everything as we go.
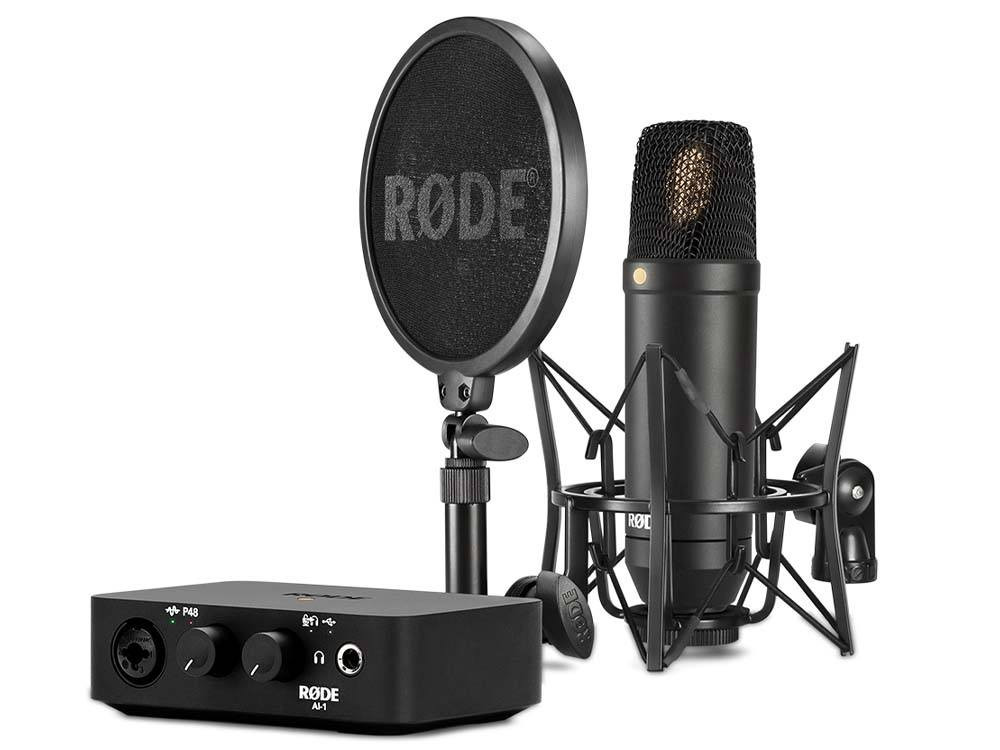
The Rode NT1 — Your Microphone
The centrepiece of this kit is the Rode NT1, a large-diaphragm condenser microphone. Let's break that down:
- Large-diaphragm refers to the size of the sensitive membrane inside the microphone that captures sound vibrations. Larger diaphragms are generally better at capturing rich, full-bodied audio — particularly vocals
- Condenser is a type of microphone technology. Condenser mics are more sensitive and detailed than dynamic mics (the type you'd see a rock singer holding on stage). This sensitivity makes them ideal for controlled environments like home studios
The NT1 is widely regarded as one of the quietest studio microphones in its class. What does "quiet" mean for a microphone? Every mic produces a tiny amount of its own noise (called self-noise), and the NT1's self-noise is remarkably low at just 4.5dBA. In practical terms, this means your recordings will be cleaner, with less background hiss — especially noticeable in quiet passages of speech or gentle vocal performances.
What beginners should know: The NT1 is a studio microphone, meaning it's designed to sit on a desk or stand in a quiet room. It's not built for handheld use or loud stages. It needs something called phantom power (a small electrical current sent through the cable) to operate — but don't worry, the included audio interface provides this automatically.
The Rode AI-1 — Your Audio Interface
If you're new to recording, this is probably the component that seems most mysterious. An audio interface is essentially a translator between your microphone and your computer.
Here's the thing: your computer's built-in sound card (the bit that handles your laptop speakers and headphone jack) isn't designed for professional audio recording. It introduces noise, has limited quality, and doesn't have the right connections for studio microphones. An audio interface solves all of these problems.
The Rode AI-1 does several important jobs:
- Provides phantom power — the 48V electrical current your NT1 condenser microphone needs to operate
- Converts analogue to digital — transforms the electrical signal from your microphone into digital data your computer can understand and record
- Controls your input level — the gain knob lets you adjust how loud or soft the incoming signal is, preventing distortion
- Provides monitoring — a headphone output lets you listen to yourself in real-time while recording, with virtually no delay
The AI-1 connects to your computer via USB, and it's class-compliant on macOS, which means it works without installing any additional drivers on a Mac. Windows users may need a quick driver install, but it's straightforward.
Beginner tip: The single most common mistake new recordists make is setting the gain too high, which causes distortion (a harsh, clipping sound). Start with the gain knob low and gradually increase it while speaking or singing at your normal volume. The level indicator on the AI-1 will help you find the sweet spot.
The Rode SM6 — Your Shock Mount and Pop Filter
The SM6 is actually two accessories in one, and both are more important than beginners typically realise.
The shock mount is the spider-like cradle that holds your microphone. Its job is to isolate the mic from vibrations — bumps on your desk, footsteps on the floor, or even the rumble from a washing machine in the next room. Without a shock mount, these vibrations travel up through the mic stand and get picked up as low-frequency rumble in your recordings.
The pop filter is the circular screen that sits between your mouth and the microphone. When you say words with hard "P" and "B" sounds (called plosives), you create a burst of air that hits the microphone diaphragm and produces an unpleasant thumping sound. The pop filter disperses that blast of air before it reaches the mic.
Why this matters: Many beginners skip the shock mount and pop filter to save money when buying gear separately, then spend hours trying to fix rumble and plosives in editing software. Having them included in this kit means your recordings will sound significantly better from day one.
The XLR Cable — Connecting Mic to Interface
An XLR cable is the standard professional audio cable used to connect microphones to audio interfaces, mixers, and other equipment. It has three pins and a locking connector (so it won't accidentally pull out mid-recording). The XLR cable also carries the phantom power from the interface to your condenser microphone.
The included cable is a quality matched cable from Rode, so you won't need to worry about cheap cables introducing noise or interference into your signal chain.
The USB Cable — Connecting Interface to Computer
This connects your AI-1 audio interface to your computer. It carries both the digital audio data and provides power to the interface — no separate power supply needed.
Understanding the Signal Chain: How It All Works Together
One of the most helpful concepts for a beginner to understand is the signal chain — the path your sound takes from your voice to a finished recording. Here's how it flows with this kit:
- You speak or sing into the NT1 microphone (positioned about 15-20cm from your mouth, with the pop filter in between)
- The microphone converts sound waves into an electrical signal
- The XLR cable carries that signal to the AI-1 interface
- The AI-1 converts the analogue signal to digital and sends it to your computer via USB
- Your recording software (called a DAW — Digital Audio Workstation) captures and stores the audio
Understanding this chain helps enormously with troubleshooting. If you're not getting any sound, you can check each link: Is the mic connected? Is phantom power on? Is the gain up? Is the USB connected? Is the correct input selected in your software?
What You'll Still Need (That's Not in the Kit)
While this kit covers the essential recording chain, there are a few things you'll need to sort out separately:
- A microphone stand or boom arm — The SM6 shock mount attaches to any standard mic stand. A desk-mounted boom arm (around $40-80) is popular for podcasters, while a floor stand works well for singers
- Headphones — You'll need closed-back headphones for monitoring while recording. Open-back headphones leak sound that can be picked up by the sensitive NT1. Budget around $60-150 for a decent pair
- Recording software (DAW) — Free options like Audacity, GarageBand (Mac), or the trial versions of professional DAWs will get you started without spending a cent
- A reasonably quiet room — Condenser mics are sensitive, which is both their strength and their challenge. You don't need a professional studio, but recording next to a noisy air conditioner or in a room with lots of hard, reflective surfaces will affect your results
Quick room treatment tip: You don't need expensive acoustic panels when starting out. Recording in a room with soft furnishings — carpet, curtains, a couch, bookshelves full of books — naturally reduces echo and reflections. Some podcasters even record inside a wardrobe full of clothes for surprisingly good results.
Who Is This Kit Best Suited For?
The Rode Complete Studio Kit hits a sweet spot that works well for several types of beginners:
Podcasters
If you're starting a podcast, this kit delivers broadcast-quality vocal recording. The NT1's low self-noise means your voice comes through clean and professional, and the pop filter handles those pesky plosives that plague podcast audio.
Voiceover Artists
For anyone getting into voiceover work — whether for YouTube, audiobooks, or commercial work — the NT1 captures vocal detail beautifully. Many working voiceover professionals use the NT1 as their daily workhorse microphone, so you won't outgrow it quickly.
Singer-Songwriters and Home Musicians
Recording vocals or acoustic instruments at home? The NT1 excels at capturing the nuances of a vocal performance or the shimmer of an acoustic guitar. The AI-1 provides clean, transparent preamps that won't colour your sound.
Content Creators and Streamers
If audio quality matters for your content (and it should — audiences forgive average video far more readily than poor audio), this kit is a significant step up from USB microphones while remaining straightforward to use.
Common Beginner Mistakes to Avoid
After years of seeing new recordists get started, these are the pitfalls that trip people up most often:
- Forgetting to turn on phantom power (48V) — If your condenser mic isn't producing any sound, this is almost always the reason. Look for the 48V button on the AI-1
- Recording too hot — "Hot" means too loud. Digital distortion sounds terrible and can't be fixed in post-production. Aim for your levels to peak around -12dB to -6dB in your DAW. It's always better to record a bit quiet than too loud
- Getting too close to the mic — Closer isn't always better. The NT1 sounds best at about 15-20cm distance. Too close and you'll get an exaggerated bass response (called the proximity effect) and worse plosive problems
- Ignoring room noise — Turn off fans, air conditioning, and noisy appliances before recording. Close windows. These sounds might seem quiet to your ears, but a sensitive condenser mic will capture everything
- Not using the shock mount — It might seem fiddly to set up, but the difference in recording quality is significant. Take the two minutes to mount it properly
Setting Up for Your First Recording Session
Here's a straightforward step-by-step to get you recording:
- Mount the NT1 in the SM6 shock mount and attach it to your mic stand or boom arm
- Position the pop filter about 5cm in front of the microphone
- Connect the XLR cable from the NT1 to the input on the AI-1 interface
- Connect the USB cable from the AI-1 to your computer
- Plug your headphones into the headphone output on the AI-1
- Enable phantom power (48V) on the AI-1 — give it a few seconds to power up the microphone
- Open your DAW and select the AI-1 as your audio input device
- Set your gain — speak at your normal volume and adjust the gain knob until your levels are peaking around -12dB
- Hit record — congratulations, you're officially recording
Don't stress about getting everything perfect on your first session. The beauty of digital recording is that you can always try again. Focus on getting comfortable with the setup and the basic workflow, then refine your technique over time.
Will You Outgrow This Kit?
This is a question many beginners rightly ask — will I need to replace everything in six months?
The honest answer is that the NT1 microphone is genuinely professional-grade. It's used in commercial studios worldwide and many professionals use it as their primary vocal mic for years. You won't outgrow the microphone itself for a very long time, if ever.
The AI-1 interface is more of a starter unit. It has a single input, which is perfect for solo recording but limiting if you later want to record two microphones simultaneously (like a two-person podcast or a singer with a separate instrument mic). When that day comes, you can upgrade to a multi-input interface while keeping the NT1 and all the accessories.
This is actually one of the smartest things about this kit — the most expensive component (the microphone) is the one with the longest useful life.
Frequently Asked Questions from Beginners
Do I need a treated studio room to use this kit?
No. A quiet room with soft furnishings will produce excellent results. Professional acoustic treatment is a future upgrade, not a prerequisite.
Can I use this kit with my phone or tablet?
The AI-1 is designed for computer use via USB. For mobile recording, you'd need a different setup. This kit is best paired with a laptop or desktop.
Is this kit suitable for recording instruments?
Absolutely. The NT1 records acoustic guitar, piano, strings, and many other instruments beautifully. For electric guitar, you'd typically use a direct input (DI) or amp simulator rather than a microphone, though the AI-1's instrument input can handle this too.
How long does it take to learn how to use everything?
Most people are comfortable with the basic setup and recording workflow within an afternoon. Getting truly polished results — understanding mic technique, room positioning, and basic editing — is an ongoing learning process, but you'll be producing solid recordings from day one.
What recording software should I start with?
If you're on a Mac, GarageBand is free and surprisingly capable. On any platform, Audacity is a solid free option for straightforward recording and editing. As you grow, you might explore professional DAWs like Reaper (very affordable), Logic Pro (Mac), or Ableton Live.
Ready to Start Recording?
The Rode Complete Studio Kit removes the biggest barrier for beginners: the paralysing uncertainty of choosing compatible gear. Instead of spending weeks researching individual components, you get a professionally matched recording chain from one of Australia's own most respected audio brands.
Whether you're launching a podcast, recording your first song, starting voiceover work, or simply want better audio for your content, this kit provides a genuinely professional starting point without the professional-level complexity.
Check out the Rode Complete Studio Kit at MusiconStage — an Australian retailer that can help answer any questions and get you set up with confidence.
And remember: the best recording setup is the one you actually use. Don't wait for perfect conditions or perfect knowledge. Get the gear, set it up, and start creating. You'll learn more from your first ten recordings than from ten more hours of research.
Browse the Rode Complete Studio Kit and start your recording journey today →