
Pioneer PLX-500 Turntable: A Beginner's Guide to Vinyl in 2026
Pioneer PLX-500 Turntable: A Beginner's Guide to Vinyl in 2026
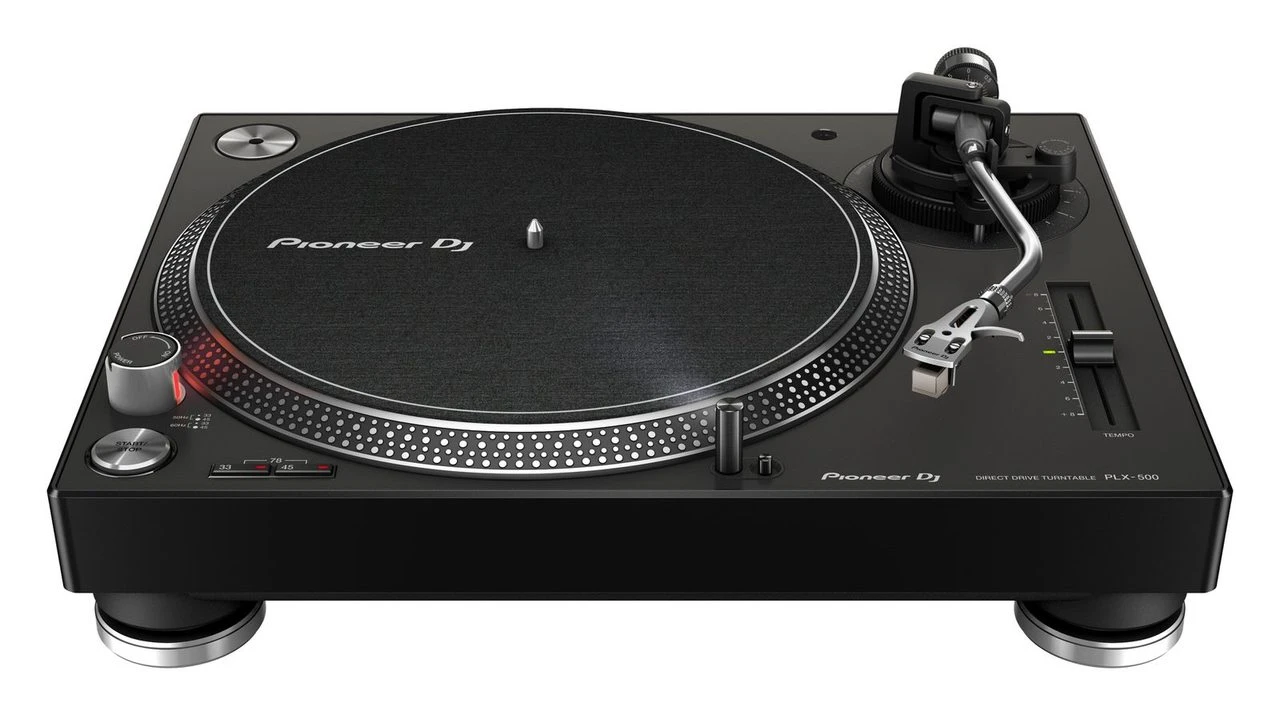
Thinking about getting into vinyl but not sure where to start? You're not alone. Turntables can seem intimidating — there's a whole vocabulary of cartridges, tonearms, and drive types that might make your head spin (pun intended). The good news is that getting started is far simpler than it looks, and the Pioneer PLX-500 is one of those products designed specifically to make the entry as smooth as possible.
In this guide, we'll break down everything a beginner needs to know about the PLX-500 — what makes it tick, why it's become a go-to recommendation for newcomers in Australia, and whether it's the right turntable for you. No jargon without explanation, no assumptions about what you already know.
What Exactly Is a Direct Drive Turntable?
Before we dive into the PLX-500 specifically, let's clear up one of the most common questions beginners have: what does direct drive actually mean?
Turntables spin a flat circular plate (called a platter) that your vinyl record sits on. There are two main ways to make that platter spin:
- Belt drive — a rubber belt connects the motor to the platter, like a fan belt in a car. It's simple and affordable but the belt stretches over time and needs replacing.
- Direct drive — the motor sits directly underneath the platter and spins it without any belt. This means more consistent speed, better reliability, and the ability to recover quickly if something touches or slows the platter.
The Pioneer PLX-500 uses direct drive, which is notable because at this price point, most turntables use belt drive. Direct drive has been the standard for DJs since the legendary Technics SL-1200 popularised it back in the 1970s. If you've ever seen a DJ scratching records, they were almost certainly using a direct drive turntable.
For you as a beginner, direct drive means less maintenance (no belts to replace), more consistent playback, and the option to try your hand at mixing or DJing down the track if you fancy it.
Pioneer PLX-500: What You're Actually Getting
Let's walk through the key features of the PLX-500, explained in plain English.
Ready to Play Out of the Box
One of the biggest headaches for turntable beginners is setup — choosing a cartridge, mounting it on the headshell, aligning the stylus, setting tracking force... it can feel like building flat-pack furniture without the instructions.
The PLX-500 ships with a cartridge already installed on the tonearm. Unbox it, set the counterweight, plug it in, and you're listening to records. That alone removes a significant barrier for newcomers.
Built-In Phono Preamp (Phono/Line Switch)
Here's a term you'll encounter quickly: phono preamp (also called a phono stage). A turntable's raw audio signal is very quiet and needs boosting before it can be heard through speakers. That's what a phono preamp does.
Many turntables require you to buy a separate phono preamp or use an amplifier that has a dedicated phono input. The PLX-500 has one built right in. Flick the switch on the back to "Line" and you can plug directly into powered speakers, a soundbar, or any standard audio input. No extra boxes needed.
If you later upgrade to a dedicated external phono preamp for better sound quality, simply flick the switch back to "Phono" and bypass the built-in one. It's a thoughtful bit of future-proofing.
USB Output for Digitising Your Vinyl
This is a standout feature that sets the PLX-500 apart from many competitors. There's a USB-B port on the back that connects directly to your computer. Paired with Pioneer's free rekordbox software, you can record your vinyl records as digital audio files.
Why would you want to do this? A few reasons:
- Create digital backups of rare or out-of-print records
- Listen to your vinyl collection on your phone or in the car
- Sample sections of vinyl into music production software
- Build a digital music library alongside your physical one
For anyone sitting on a crate of old records from parents or grandparents, this feature alone can justify the purchase.
The S-Shaped Tonearm
The tonearm is the long arm that holds the cartridge and stylus (the needle) over the record. The PLX-500 uses an S-shaped tonearm, which is the classic design you'll see on most professional turntables.
What matters for beginners:
- It has an adjustable counterweight — this sets how much pressure the needle applies to the record. Proper tracking force protects both your records and your stylus.
- It includes anti-skate adjustment — this counteracts the natural tendency of the tonearm to drift inward, keeping the needle centred in the groove.
- The height is adjustable — so you can fine-tune it if you swap to a different cartridge later.
- It uses a standard half-inch mount headshell — meaning you can upgrade to virtually any cartridge on the market.
Speed and Torque
The PLX-500 plays at 33⅓ RPM (standard LPs) and 45 RPM (singles and some audiophile pressings). A pitch slider allows you to adjust speed by ±8%, which is primarily a DJ feature for beatmatching but can also be handy for fine-tuning playback.
Starting torque is rated at >1.6 kgf·cm. In practical terms, this means the platter gets up to speed quickly and maintains that speed reliably. It's enough for learning to mix records and light scratching, though serious turntablists would want something with more grunt (like the PLX-1000 at >4.5 kgf·cm).
Who Is the PLX-500 Actually For?
This is an important question because no single turntable is perfect for everyone. Here's an honest breakdown:
It's a Great Fit If You're...
- New to vinyl and want a quality turntable without the complexity of separate components
- A budding DJ learning to beatmatch and mix — the direct drive and pitch control give you the fundamentals
- Digitising a record collection — the USB output and rekordbox software make this straightforward
- Looking for long-term value — it's built well enough to grow with you, and the upgradeable cartridge means you can improve sound quality over time without replacing the whole unit
- Working with limited space — at roughly 450 x 353mm, it's reasonably compact
It Might Not Be Right If You're...
- A serious scratcher or turntablist — the torque, while decent, isn't built for heavy performance scratching. Look at the PLX-1000 or Technics SL-1200MK7 instead.
- Purely an audiophile listener with a big budget — dedicated hi-fi turntables from the likes of Rega or Pro-Ject may offer better pure listening performance, though they lack DJ-friendly features.
- Already experienced and looking for a professional-grade deck — the PLX-500 is deliberately positioned as an entry-level to mid-range unit.
What Beginners Should Know Before Buying
Here are the most common things newcomers overlook or get confused about. Knowing these upfront will save you time, money, and frustration.
You'll Probably Want to Upgrade the Cartridge Eventually
The included cartridge is functional and perfectly fine for getting started, but it's entry-level. After a few months, once your ears have adjusted and you know you're committed to vinyl, consider upgrading to something like an Audio-Technica AT-VM95E or Ortofon 2M Red for home listening. If you're leaning towards DJing, an Ortofon Concorde series cartridge is worth investigating.
The good news: swapping cartridges on the PLX-500 is straightforward thanks to the standard headshell mount. Plenty of YouTube tutorials will walk you through it in under ten minutes.
You Need Speakers (and Maybe an Amplifier)
A turntable doesn't make sound on its own — you need speakers. Because the PLX-500 has a built-in phono preamp, you have two simple options:
- Powered (active) speakers — these have their own built-in amplification. Just connect the PLX-500's RCA outputs directly (with the switch set to "Line"). This is the simplest, most affordable setup for beginners.
- Passive speakers + amplifier/receiver — if you already own a hi-fi system or stereo receiver, connect the PLX-500 to one of its inputs. If your receiver has a phono input, you can set the turntable to "Phono" and let the receiver handle the preamp duties.
Placement Matters More Than You Think
Turntables are sensitive to vibration. The stylus is essentially a tiny sensor that reads microscopic grooves — any external vibration will come through as unwanted noise or rumble. Place your PLX-500 on a stable, level surface away from speakers. A solid shelf or dedicated turntable stand works well. Avoid wobbly tables, speaker tops, or surfaces near heavy foot traffic.
Handle Records and the Stylus with Care
This might sound obvious, but it's worth emphasising for newcomers: always hold records by their edges and the label area. Fingerprints on the grooved surface attract dust and degrade sound quality over time. And never touch the stylus (needle) with your fingers — it's delicate and replaceable styli aren't free.
Setting Up Your Pioneer PLX-500: What to Expect
The setup process is genuinely beginner-friendly, but here's a realistic walkthrough so you know exactly what's involved:
- Unbox and assemble — attach the platter, place the slip mat on top, attach the dust cover hinges. Roughly 5 minutes.
- Balance the tonearm — adjust the counterweight until the tonearm floats level, then set it to the recommended tracking force for the included cartridge (usually around 3.5 grams). There's a calibrated dial on the counterweight. Takes about 5 minutes your first time, 30 seconds once you've done it before.
- Set anti-skate — match the anti-skate dial to your tracking force number. Takes 5 seconds.
- Connect to speakers — RCA cables out to your powered speakers or amplifier. Set the phono/line switch appropriately.
- Play a record — place the record, start the platter, gently lower the tonearm using the cueing lever. Done.
Total setup time for a complete beginner: roughly 20-30 minutes, mostly spent on tonearm balancing. It's not difficult — just take your time and follow the manual or a video guide.
Pioneer PLX-500 Specifications at a Glance
| Drive Type | Direct Drive |
| Motor | DC Motor |
| Speeds | 33⅓ RPM, 45 RPM |
| Starting Torque | >1.6 kgf·cm |
| Platter | 332mm die-cast aluminium |
| Tonearm | Static-balanced S-shaped |
| Cartridge | Pre-installed MM cartridge |
| Outputs | RCA (phono/line switchable), USB-B |
| Pitch Control | ±8% |
| Dimensions | 450 x 353 x 159mm |
| Weight | Approx. 10.7 kg |
Common Beginner Questions About the PLX-500
Can I DJ with the PLX-500?
Yes, with realistic expectations. It's a solid turntable for learning to DJ — you can beatmatch, blend tracks, and practise basic mixing. The direct drive and pitch slider give you the tools you need. For light scratching, it handles itself respectably. However, if your goal is battle-style turntablism or heavy performance scratching, you'll eventually want to step up to a higher-torque deck.
Do I need to buy a cartridge separately?
No. The PLX-500 comes with a cartridge pre-installed, so you can start playing records straight away. You may want to upgrade it later for better sound quality, but it's not essential from day one.
Can I connect it directly to Bluetooth speakers?
Not directly — the PLX-500 doesn't have Bluetooth built in. You'd need a small Bluetooth transmitter plugged into the RCA outputs. That said, wired connections will always sound better than Bluetooth for vinyl playback, so if you're investing in the analogue experience, wired speakers are worth considering.
How does it compare to cheaper turntables under $300?
Most turntables under $300 AUD use belt drive, plastic platters, and fixed (non-upgradeable) cartridges. The PLX-500 gives you direct drive, a die-cast aluminium platter, a proper S-shaped tonearm with standard cartridge mounting, and USB output. The difference in build quality, longevity, and upgrade potential is significant. It's genuinely a different class of product.
Is it heavy enough to be stable?
At roughly 10.7 kg, the PLX-500 has a satisfying heft. It's noticeably more stable than lightweight budget turntables, though it's lighter than professional decks like the PLX-1000 (13.1 kg) or the Technics SL-1200MK7. On a solid surface, vibration and movement are rarely an issue during normal use.
Your Growth Path: What Comes Next
One of the best things about the PLX-500 is that it doesn't box you in. Here's a realistic upgrade path as your interest in vinyl deepens:
- First upgrade — cartridge: Swap the stock cartridge for something better. Budget around $80-$150 AUD. This is the single biggest sound quality improvement you can make.
- Second upgrade — speakers: Better speakers or adding a subwoofer will transform your listening experience.
- Third upgrade — external phono preamp: A dedicated phono stage (from about $100-$300 AUD) will give cleaner, warmer amplification than the built-in preamp.
- Down the track — second turntable + mixer: If DJing hooks you, add another PLX-500 and a two-channel DJ mixer for a proper mixing setup.
The turntable itself should serve you well for years. It's built to last and doesn't have consumable parts like drive belts that need periodic replacement.
Final Thoughts: Is the Pioneer PLX-500 Worth It in 2026?
The PLX-500 occupies a sweet spot that's genuinely hard to beat for Australian beginners. You're getting direct drive reliability, a built-in phono preamp that simplifies your setup, USB digitising capability for preserving your records, and a turntable that's ready to play out of the box — all from a brand with decades of DJ and audio heritage.
It's not trying to be everything to everyone. It won't satisfy professional turntablists or dedicated audiophiles with five-figure hi-fi systems. But for someone stepping into the world of vinyl for the first time — whether you want to listen to records at home, learn to DJ, or digitise a collection of old LPs — it delivers genuinely impressive value and a platform you can grow with.
If you're ready to start your vinyl journey, the PLX-500 is a confident, well-proven place to begin.
Ready to get spinning? Check out the Pioneer PLX-500 at MusiconStage — available for delivery across Australia.
Got questions about turntables, cartridges, or setting up your first vinyl system? Get in touch with the MusiconStage team — we're always happy to help beginners find the right gear.